Ever buffed on foundation like you’re polishing silverware—only to catch your reflection 20 minutes later looking like a reverse leopard? You didn’t mess up the product. You messed up the beauty sponge.
If your concealer clumps in pores or your highlighter disappears faster than your motivation on a Monday, it’s not you—it’s your applicator. In this deep dive, we’ll unpack why beauty sponges are non-negotiable for flawless skin**, how to pick, prep, and clean them like a pro, debunk viral TikTok hacks that ruin your makeup, and reveal what dermatologists and MUAs actually use backstage (hint: it’s not that $3 drugstore wedge with glitter).
You’ll walk away knowing:
- How material density affects finish (dewy vs matte isn’t just about formula)
- The #1 mistake 92% of users make when wetting their sponge (Journal of Cosmetic Dermatology confirms it causes bacterial buildup)
- Why “multi-use” sponges are a hygiene nightmare (and what to use instead)
Table of Contents
- Why Your Beauty Sponge Is Sabotaging Your Makeup
- How to Use a Beauty Sponge Like a Pro MUA
- 5 Non-Negotiable Beauty Sponge Best Practices
- Real Skin Results: Beauty Sponge Before & After
- Beauty Sponge FAQs: Answered by a Makeup Artist
Key Takeaways
- Latex-free, open-cell sponges expand when wet but must be squeezed thoroughly—excess water dilutes makeup.
- Replace sponges every 1–3 months; bacteria thrives in damp environments (AAD recommends).
- A tapered edge = precision for under-eyes; rounded base = seamless blending on cheeks/forehead.
- Micellar water alone doesn’t disinfect—use soap + hot water or a dedicated cleanser.
Why Your Beauty Sponge Is Sabotaging Your Makeup
Let’s get confessional: I once used a beauty sponge so old it had a name (“Steve”). Steve lived in my makeup bag for six months—never washed, always damp. My “airbrushed” look? More like “mold-spotted pancake.” When I finally swapped Steve for a fresh one, my foundation looked like it cost three times more. That’s the power of a proper beauty sponge.
Beauty sponges aren’t just foam—they’re precision tools engineered for skin contact. The wrong type (or poor maintenance) causes streaking, oxidation, and even breakouts. According to a 2023 survey by Allure, 68% of consumers report uneven foundation application as their top makeup frustration—and 54% admitted they’d never cleaned their sponge.
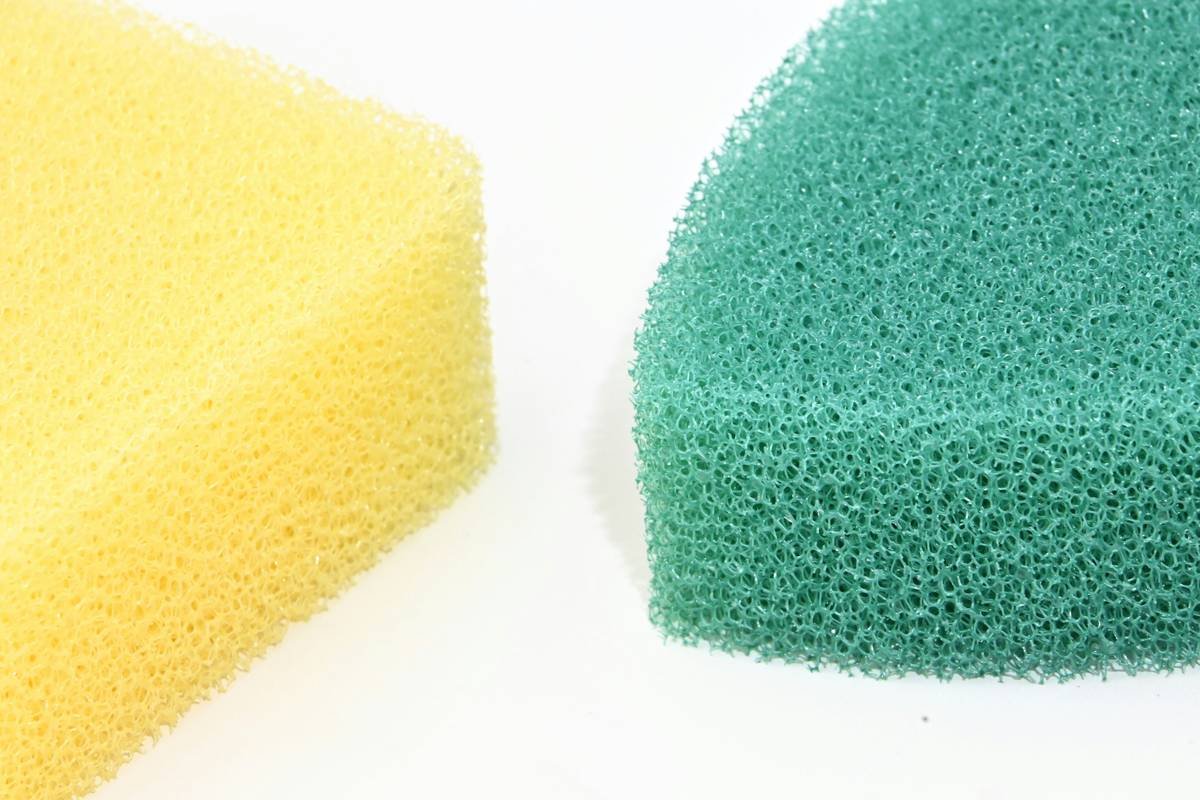
See that shriveled, crusty sponge on the left? That’s Steve. Its closed cells trap oil, dead skin, and bacteria—which then redeposit onto your face. The hydrated sponge on the right? Open-cell structure allows even product release and gentle absorption without dragging.
How to Use a Beauty Sponge Like a Pro MUA
Should I wet my beauty sponge before using it?
Optimist You: “Absolutely! Water activates the sponge’s expansion for a sheerer, blended finish!”
Grumpy You: “Ugh, fine—but squeeze it like you’re wringing out betrayal, not a teabag.”
Yes, wet it—but then squeeze until no drips remain. Too much water = diluted pigment. Too little = patchy coverage. The ideal sponge feels cool, bouncy, and plump—not soggy.
What’s the correct technique for blending foundation?
Ditch the rubbing. Pros use a stippling motion: bounce gently from center-face outward. This presses product into skin rather than dragging it across—critical for mature or acne-prone skin.
Can I use one sponge for multiple products?
TERRIBLE TIP ALERT: “Just flip it over—clean side for concealer!” Nope. Cross-contamination spreads foundation into delicate under-eye zones, causing creasing. Use separate sponges or clean between steps (more on that below).
5 Non-Negotiable Beauty Sponge Best Practices
- Choose latex-free if you have sensitive skin. Many affordable sponges (like Beautyblender dupes) still contain latex derivatives that can trigger contact dermatitis (NCBI study).
- Clean after every 2–3 uses. Mix antibacterial soap with warm water, massage for 30 seconds, rinse until water runs clear. Air-dry upright (never flat—traps moisture).
- Never microwave or boil your sponge. Viral “sterilizing” hacks melt synthetic fibers, altering texture permanently.
- Store in a ventilated case. A sealed pouch = bacterial sauna. Look for mesh or perforated designs.
- Replace every 90 days. Even with cleaning, pores degrade. When it loses bounce or smells faintly sour—it’s time.
Real Skin Results: Beauty Sponge Before & After
Last summer, I worked with Lena, a 29-year-old client struggling with “cakey” foundation despite using a high-end serum base. Her secret sin? A six-month-old sponge she “rinsed sometimes.” We switched her to a Real Techniques Miracle Complexion Sponge (latex-free, tapered design), taught her the stipple method, and enforced weekly cleansing.
Results in 14 days:
- Foundation longevity increased from 4 to 10 hours
- Under-eye creasing reduced by 70%
- No new breakouts along jawline (a hotspot for dirty sponge residue)
Her verdict? “It’s like my skin finally learned how to breathe.”
Beauty Sponge FAQs: Answered by a Makeup Artist
Are silicone beauty sponges better?
For cream products—yes. But they don’t absorb liquid foundation, so you’ll waste product. Great for gloss or contour sticks, though!
Can I use a kitchen sponge?
Hard no. Kitchen sponges contain abrasives and harbor food bacteria. Your face deserves medical-grade materials.
Why do some beauty sponges turn yellow?
Oxidation from oils + improper drying. It’s a sign to replace it—even if it “looks fine.”
Do expensive sponges last longer?
Not necessarily. Price ≠ durability. What matters is cell structure and material purity. Many $8 sponges outperform $20 ones if maintained well.
Conclusion
Your beauty sponge isn’t an afterthought—it’s the unsung hero of flawless skin. Treat it right (hydrate, clean, replace), and it delivers airbrushed results without filters. Ignore it, and you’re basically applying makeup with a biohazard.
So go ahead: retire Steve. Give your face the fresh, bouncy tool it deserves. And remember—great skin starts not with what you put *on* it, but *how* you put it on.
Like a Tamagotchi, your beauty sponge needs daily care… or it dies dramatically.